Thursday, April 28, 2016

Easter 2015

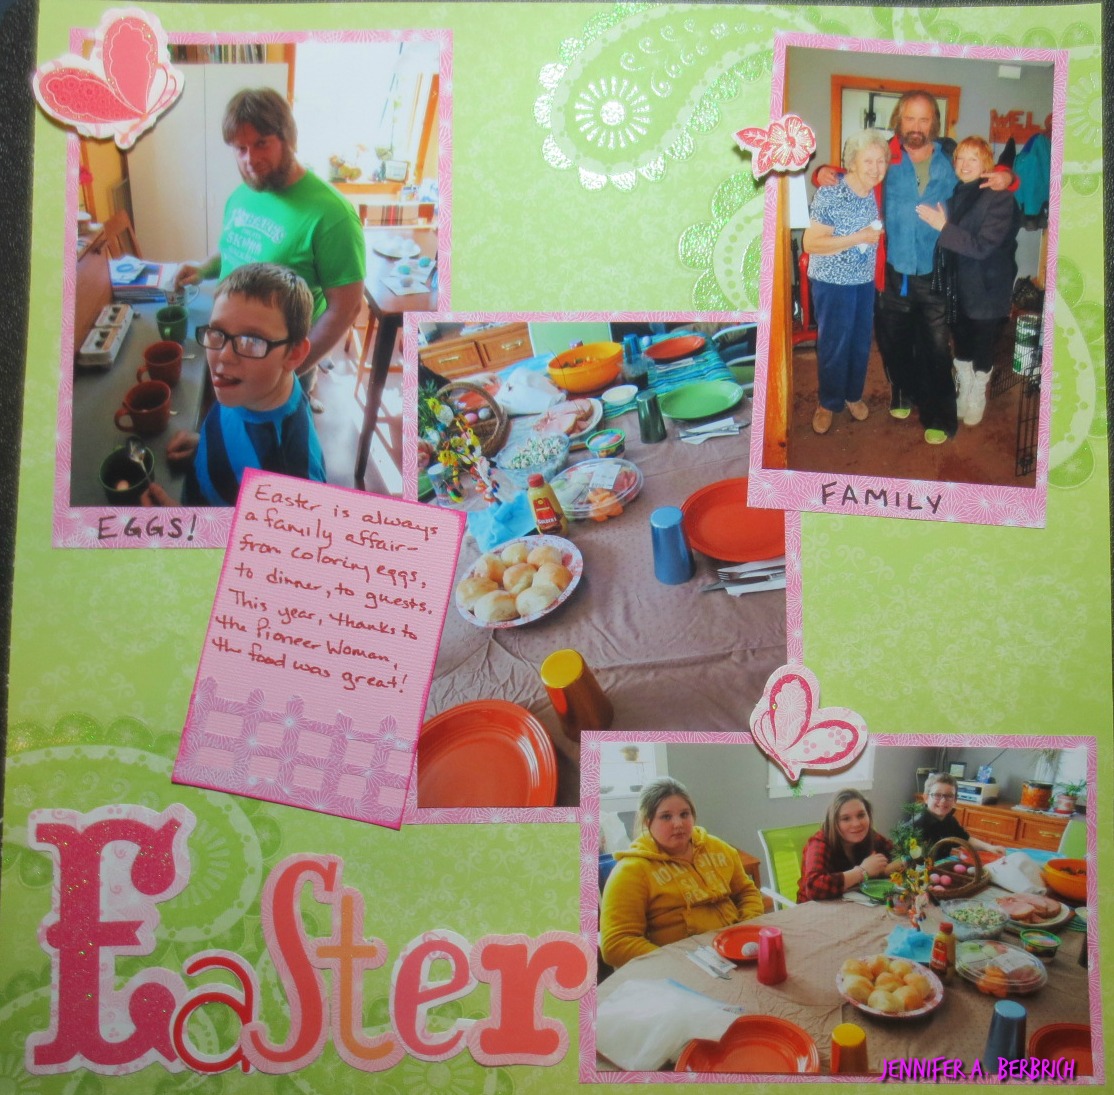
     Ack!  I haven’t posted and I have been meaning to!  I’ve not sat idly by, praying my 2015 scrapbook pages get done.  I have been actively working on them, every time I get a chance!  This page I finished a couple weeks ago.  I’ve finished others but I haven’t taken photos of them yet.  I’m looking for a better way than standing on a chair and twisting not to get a shadow.  

     You know what I’m talking about.

     I love the colors in this page – just very springy and Easter-y.  And the subjects, well, one cannot help but love them.


Happy late Easter everyone!

Thursday, April 14, 2016

Prison Break!


Last night I worked on my “Prison Break” scrapbook.  I haven’t done anything with it for a while and it has been languishing on my kitchen table for a couple of months.  Not good – especially since the table is cafĂ© style and no one else can use it while there are stacks of scrapbook paper and newspapers and glue sticks all over it.  Right now I’m up to 47 pages, front and back.  All of it newspaper articles.  I’m not sure if I can download newscasts about it.  If I can, I may burn them to a disk and include them too.  My hope is that Ron Howard or Tom Hanks will want to do a movie and will come to me and ask to use the data I’ve put together.  They will woo me with gifts and dinners and kind words and lots of $$$, and I will be gracious enough to hand it over.  Yes, my dreams are grand, but there are good people in them! 

I’m not sure how I’m going to bind all of this either.  Will I put it in a regular scrapbook binder, or a 3-ring, or maybe a comb? 

***

Wow!  Wrote that about six months ago!  Anyone else behind in their projects?  Just me????  Well, last night I did take out my Prison Break scrapbook and the few newspaper articles I had left and got to work. 

I didn’t make this fancy for a reason.  It was a prison break, not a party.  I added a few stickers – tongue in cheek, if you will, about travel and camping.  To be fair, it’s very hard to find prison stickers.  If there are any out there please send them to me! 

Honestly, even though it was a county away I was afraid.  We made sure the doors were locked, that the animals were inside, that there was a weapon close by in case of a confrontation.  Thank God we never had to meet one of these guys.

I think I will have to outline my “Breaking Out” letters on the front to make them stand out more, but other than that I’m happy with the finished project.  Now I can back to scrapping everyday life in 2015!


Have you ever made an entire scrapbook out of an event that happened in the public eye?  Why did you do it?  How did you scrap it?  Did you share it with anyone?


Tuesday, April 12, 2016

April Stack-A-Holic Challenge

It’s April and it’s also time for the Scrap-A-Holic Challenge from DCWV.  I realize it looks as though I’m only working on these challenges now, but they are my kick-start.  I’m also working on something very special which I will show to you soon – just not today.

As you may know from previous posts, I am a year behind on my scrapbooking.  For the April challenge, I have scrapbooked my mother’s birthday from a year ago, yesterday.  I’m hoping her birthday this year will get scrapped sooner! 

I used the Scripts and Music Notes paper stack from DCWV as the background.  I love this paper!  It’s so dreamy and soft and feminine.  Perfect for my mother’s birthday. 

I also used my Creative Memories Border Punch system to create a notebook effect on the side of the page and my Suburbia Cricut cartridge to make the tea cup and lettering.  When I think of mom, I think of tea.  That’s her go-to drink.  She used to take it with one sweet-n-low but now she’s switched to a teaspoon of sugar, and milk.  I propped the teacup on foam squares to give the page dimension, although you can’t see it here.  I also gave it a little bling with some glitter glue.  I love that stuff!

Did you see my flowers?  I used the leftovers from cutting my border and made them into stems and leaves!  So cute and a great way to use scraps! (Scraps? Scrapbooking?  It's a win!)

I have an extra pad of the DCWV Scripts and Music Notes paper that I will be giving away in the future.  Please follow my blog so you’ll know when that will be happening.


Sunday, March 13, 2016

Postcards!

Recently I was turned on to a site that promotes international communication.  It’s called Postcrossing, and it encourages people to send postcards to strangers.  They give you names and addresses after you set up a profile.  Once a postcard you send is received, then you become eligible to receive one from someone.  I love this idea!  I love receiving mail through the post office, I love pictures, and I love the idea of connecting with others from different cultures. 

I signed up in January, went out and purchased a couple of postcards and started sending.  You can send as many, or as few, as you would like.  I’ve sent out six so far with one getting ready to go today. 

The one I’m sending out today is going to a girl in Germany who wouldn’t mind getting a homemade card.  Some people specify that they want specific cards – art, places, history, dogs, cats, etc.  This girl likes food and recipes.  It gave me an idea.

I went to the local craft store to see if I could get a postcard stamp.  Alas, no luck.  I ended up ordering a set of Tim Holtz postcard stamps.  


They seemed the most versatile.  The others I saw didn’t appeal to me, but I always try to keep an open mind.  The stamps were delivered to me yesterday, so last night I set out to work.  The only food photo I found was of the birthday cake I made a few years ago for Gaige.  


I trimmed the edges a little and set it on a 4”x6” piece of cardstock that I had salvaged from an old report.  I glued it on with Aileen's Tacky Glue.  I really want this photo to stay on during shipping.  I stamped the back and let it dry and now it’s ready for an address and note!


I really am excited about sending it out.  I hope she likes it.  What I truly want is to have a pen pal.  I had one when I was a kid.  She was from Japan and we sent letters all the time until we were in our late teens.  I don’t know why we stopped.  Perhaps it was boys and dating.  I know in my case that was probably it.  I wish I knew what happened to her.  I miss learning about someone else’s culture through private letters.  It’s one thing to read Wikipedia.  It’s another to read it in someone else’s handwriting about their very own experience.


I hope you like the postcard and the idea of it.  It’s a pretty simple project, but one that can give you a lot of satisfaction and could definitely brighten another’s day.

Thursday, March 10, 2016

Syrup Time!


Several weeks ago I completed several surveys through DCWV and received a lovely paper stack from them!  What a surprise when they contacted me!  Thank you so much DCWV!  

I received the Luxe Lodge stack about a week after being notified and at first I thought to myself “How am I going to use this?”  Well, I had just started scrapbooking again, after a self-imposed hiatus (because I have no room in my house) and as I was going through my photos I came across the Maple Syrup Weekend photos from 2015. 

Here is a sampling of the different papers:

This is my favorite


Ok, as you can see, I love plaid...


        We do MSW every year with the kids and it’s so much fun because we get to taste NEW maple syrup and maple candy, smell the sap being boiled into liquid happiness, pet the alpacas, and ride through the countryside and woods in a wagon drawn by beautiful draft horses.  We always look forward to it, and we always say we’re going to try a different place the next year, but then we end up back there with the animals.  We love them.  Every time I see the alpacas I want to get a couple.  Unfortunately, living in the village put a stop to that.  Maybe someday…

So anyway, I took some liberties with the March challenge.  The main one being that I used two photos instead of one.  Most of the pages I create have two or more photos on them – I like to get as many memories in there as my scrapbooks have taken the place of my photo albums.  I used the birch tree paper as the main background page as it gives one the feeling of riding through the woods.  


I used the pine cone paper as my photo mat and my title words.  I love the pine cone paper!  


One of the circles under the photo matting is DCWV burlap paper from the 6” stack.  I love the texture!  It also lends itself to the outdoorsyness (NOT a word but using it anyway) of the photos and paper.

My Cricut was useful for the letters and the arrows for the forest signs.  I traced around them to make them stand out a little more and then added some directions for fun.

I had a really great time doing this challenge.  It’s been awhile since I have even tried, though I wanted to, and it just seems to me that I need to make time for what I want to do.  Even if it’s just a half hour a couple times a week.  Being among my paper and crafting supplies was therapeutic. 


Friday, October 9, 2015

Painting Tonight

          A quick post tonight.  Yesterday we got a message from the play director that they need a painting of a barn for the performance in a couple weeks.  D asked if I would mind painting one and of course I was hoping he would ask.  So while he was at practice tonight, I was at home getting a little creative.  As it is only the second painting I have ever done, there's not a whole lot of technique here.  However, my cat AJ, who died two years ago this past August, decided to show up.  She's sitting on the bail watching a mouse or a bird in the barn and her tail is just a twitching.  I miss my girl.  I'm glad she found her way into my painting.  I hope you enjoy.


Monday, October 5, 2015

Ghouling Around!

I swear to all that is holy that I had more fun this weekend helping the kids make ghosts than they did in the actual making!  From the last post, you know I found my idea for ghosts on Pinterest.  I really wanted to make the sitting ghoul, but I don’t have a baby doll (or a child that will sit long enough to let it harden – ha! Ha!) and neither does my Hannah.  I will have to make a trip to the thrift shop and find one.

Anybooo, (see how I did that?) we started out with a balloon, fabric stiffener, a couple of tall things to set the balloons on, and adhesive spray.  The last part wasn’t called for in the instructions, but I figured it would make the balloon stick to whatever it needed to, better.  More on that later.


First the kids blew up the balloons.  We used spray adhesive to secure one balloon on a tall skinny table.  NOT A GOOD IDEA!  That stuff is sticky!  It stuck to my hands and I had to wash them three times with different soaps until I could help with the project again.  Plus, it did stick to the table, but there is definitely some still stuck to it.  We put the spray away at that point.

Next we poured fabric stiffener in a large bowl.  They used two yards of cheese cloth in one yard pieces for each ghost.  That way they could drape it differently if they chose.  We tried to use gloves, we really did try, because the directions on the bottle said to – but we really couldn’t unbunch the cloth with them on!  So I tried it first without, just in case my hands burned and my skin started to fall off.  I was fine.  So were the kids.  Gaige wasn’t crazy about the goopiness of the stiffener but he got through it.


The draping was a trip but it was also the best part.  Cheese cloth looks like it is all straightened out and then you realize that it’s not and there’s more material to unravel!  Good times!  


After both ghosts were set up and drying the kids turned their attention to more important things – namely YouTube and funny cat videos.

Speaking of funny cat videos, this one is my favorite:  
https://youtu.be/0Bmhjf0rKe8


I hope this inspires you to try the ghost project.  It didn’t take long to dry and the mess really is minimal.  You don’t need a lot of stiffener, and I added some water to mine to make it easier to use.  I had a lot left over.  The kids had a good time and were happy with the finished product.


 I wish I had more cheese cloth.  I would have an army of these ghouls around the house.  Definitely a good project for a rainy or cold and windy day.  I hope you try it!  Post your pix – I would love to see them!